Strawberry Ice Cream

A tasty, light ice cream, perfect for those hot summer days. This can be made with fresh or frozen strawberries. Simple and quick to make.

If you haven’t read my post on the ice cream base, check it out for more information.

Ingredients

2 cups whole milk
5 oz heavy cream
1 cup sugar
1/2 tsp vanilla (optional)
2 – 3 cups strawberries

Directions

Put the strawberries and half of the sugar in a pot. Slowly bring to a boil and then simmer for up to 5 minutes. Remove from heat.

Put 1 cup of the milk in a pot with the remaining sugar and heat just enough to dissolve the sugar while stirring. Transfer to another container and place in the refrigerator to cool completely. Add the remaining milk, the heavy cream, and the vanilla and put back in the refrigerator.

Put about half of the strawberries, and any strawberry liquid, in a blender and puree them. Transfer to another container and place in the refrigerator to cool completely. Put the remaining whole strawberries in the refrigerator.

(There’s a theme here: Get everything very cold before putting it in the ice cream machine. Even a little time in the freezer helps.)

After the ingredients are cold, stir the pureed strawberries into the milk/cream mixture. Set up your ice cream machine, pour in the base, and start it up. Once the ice cream is ready, transfer it to a 2 quart tub while folding in the remaining strawberry pieces. (Don’t be too aggressive or you will lose the air that was churned in by the ice cream maker.)

Cover with plastic wrap on the surface of the ice cream and put the lid on the tub. Place in the freezer for several hours or overnight.

Ice Cream Base

There are fundamentally two types of ice cream base: the French style and the Philadelphia style. French style uses egg yolks to create a silky custard base. Philadelphia style does not use eggs and this makes it much simpler for the home ice cream maker, like me. The Philadelphia method was created by Eleanor Parkinson in 1818. She insisted that it must be only sugar, cream, and flavorings. Not being a purist, I use a blend of cream, milk, and sometime other dairy products.

(Side note here: To be called Ice Cream, it must be at least 10% milk fat. Heavy cream is typically 33% milk fat and whole milk is about 3.25%.

I am a big fan of Jeni’s Splendid Ice Cream based in Columbus, Ohio. I have her recipe book and have made many of the recipes. However, I have recently moved to the simpler Philadelphia style base for several reasons. The main one being simplicity. Jeni’s is a premium ice cream and no doubt uses the French method. The home recipes use corn starch as a thickener to simulate the texture. This requires boiling the mixture to activate the corn starch, then cooling in a ice bath or the freezer before churning. I am not fan of the texture that corn starch imparts to the finished ice cream. Also, I have found that some people can taste the corn starch.

Regardless of which base is used, Jeni’s book gives a lot of good advice on making ice cream and, more importantly, gives a range of scrumptious flavors and how to achieve them. Goat Cheese with Roasted Red Cherries is my favorite!

In the recipes I present, you will see a variety of milk products used depending on the desired end result. Heavy cream and whole milk will be typical but evaporated milk, half and half, yoghurt, and others may show up. Each has its own flavor profile. As long as the appropriate level of milk fat is there, the choice of dairy product is up to you.

German Chocolate Ice Cream

This recipe is for an ice cream that is similar in flavor to the German Chocolate Blizzard I used to get from DQ. They don’t typically carry it on their menu these days. I always asked them to use chocolate ice cream instead of vanilla ice cream with chocolate syrup. Why? Because the syrup made it too sweet for my taste.

The name is arguably a misnomer but I am sticking with it. (If you look up the history of that cake on Wikipedia you will find that it is named after Samuel German, a chocolate maker, not after the country.) The flavors here are reminiscent of those in a German Chocolate cake: the pecans, coconut, and evaporated milk show up in the filling and icing.

Ingredients

1 1/2 cups whole milk
1 cup evaporated milk
1/2 cup heavy cream
3/4 cup sugar
1/4 tsp sea salt
4-6 tbsp cocoa powder (depending on taste)
3/4 cup toasted pecan pieces
3/4 cup sweetened shredded coconut

Directions

Toast the pecan pieces lightly in a frying pan. Set aside to cool.

Sift, or thoroughly mix, the sugar, salt, and cocoa powder together. This will allow you to add them to the liquid without the cocoa powder clumping.
Put the whole milk in a pot and warm it on low to medium heat. Add the sifted dry ingredients while stirring just until the sugar is dissolved. Take off the heat.
Transfer it to another container, stir in the evaporated milk and heavy cream, and place in the refrigerator to cool for a couple of hours. (Maybe even put it in the freezer for a short while. Having it cold when it goes into the ice cream maker is essential.)

Set up your ice cream machine, pour in the base, and start it up. Once the ice cream is ready, transfer it to a 2 quart tub while folding in the pecans and coconut. (Don’t be too aggressive or you will lose the air that was churned in by the ice cream maker.) Cover with plastic wrap on the surface of the ice cream and put the lid on the tub. Place in the freezer for several hours or overnight.

Plum Pudding

This recipe is based on “Tiny Tim’s Plum Pudding” recipe at the Taste of Home website. I see this same recipe on many sites so I can’t give credit to the original author but I can link to the site where I first found it. My modifications have been minor because it is a fine recipe to start with. But I made a few changes and notes that made a significant difference.

Ingredients

1/2 cup butter, softened
3/4 cup packed brown sugar
3 large eggs, room temperature
3/4 cup dry bread crumbs
1/2 cup flour
1 tablespoon grated orange zest
1 teaspoon ground cinnamon
1/2 teaspoon baking soda
1/2 teaspoon ground nutmeg
1/4 teaspoon ground cloves
1/4 teaspoon salt
2 – 15 oz cans whole plums, drained, pitted, chopped
1-3/4 cups chopped Medjool dates
2/3 cup raisins
1/3 cup dried cherries
1 cup golden raisins (sultana raisins)
1/2 cup dried currants
1 cup shredded carrots
1 oz brandy

Directions

Mix all dried fruit ingredients in a bowl with the brandy.
Generously grease an 8 cup pudding mold or two 4 cup pudding molds.
Chop dates.
In a medium size bowl, mix bread crumbs, flour, orange zest, cinnamon, nutmeg, cloves, baking soda, and salt.
In a large bowl, cream the butter and sugar until light and fluffy. Add eggs one at a time, beating well after each.
Gradually add the spice/bread crumb/flour mixture.
Drain the brandy from the dried fruits. Add the chopped dates and mix well so that the dates are well distributed.
Fold the fruits into the mixture in the large bowl.
Transfer to the pudding mold(s). Cover tightly with heavy foil and tie the foil with string to secure it.
Place on a rack in a stockpot with about 2 to 3 inches of hot water. Bring to a gentle boil and steam the pudding for 2 to 2-1/2 hours or until a toothpick in the center comes out clean. Add water as needed to prevent the stockpot from drying out.
Remove the pudding from the stockpot and let cool for 5 or 10 minutes before removing from the mold.
If serving immediately, prepare the Hard Sauce, unmold the pudding onto a serving plate, and serve warm.

Notes

  • For best results, use fresh spices. Zest a whole orange instead of using dried zest from the store. Grate nutmeg from a whole nut. You get the idea.
  • Use light or dark brown sugar. I prefer dark.
  • For dramatic presentation, pour a couple of ounces over the pudding, turn out the lights, and set it on fire when bringing it to the table.
  • Don’t use dried, already chopped dates. Use ‘fresh’ dates. They are messy to pit and chop but the result is well worth it. This alone makes a major difference in the final result.
  • For a smaller group, use two 4 cup molds. Serve one immediately and freeze the other. (Unmold it, wrap it in cheesecloth or plastic wrap, put it back in the mold, cover well and freeze.)
  • Make sure you have a way to get the hot molds out of the stockpot. I used string to create a simple kind of hanging basket that I could lift out easily.

Dr. Rebecca Lancefield’s Eggnog

I first heard about this recipe on an NPR program. The comments and recipe below were copied, in 2013, from a website whose name and URL I have long forgotten. I have made this many times over the years and always enjoyed the results.

As I recall from the NPR program, at some point Dr. Lancefield and her colleagues wondered about the science behind making this with a dozen raw eggs and nobody ever becoming sick from it. So they did an experiment. They made a batch and injected a massive dose of salmonella into it. It then sat in the fridge and was tested each week. After a short time–two or three weeks if memory serves–there was no trace of salmonella. The alcohol did what you might expect. If there is a lesson from this, I would say: Don’t skimp on the alcohol and Do make it by Thanksgiving to be consumed at Christmas.

With that said, the following is the recipe as I copied it down.

Dr. Rebecca Lancefield’s Eggnog

This recipe comes from Dr. Rebecca Lancefield (1895 – 1981), a prominent microbiologist who worked at The Rockefeller University. One of her perhaps lesser-known legacies is related to eggnog: every year, she would make eggnog in the lab before Thanksgiving, let it “mellow,” and then serve it at Christmas. Forty years later, the eggnog tradition persists in that laboratory.

Ingredients

12 Eggs
1 Pint Bourbon or Tennessee Sour Mash Whiskey
1 Quart Rum
1 Quart Heavy Cream
1 Quart Light Cream
1/2 – 3/4 Lb Sugar (to taste)
Nutmeg

Directions

Beat the eggs, add bourbon and rum slowly while stirring to prevent precipitation of egg proteins.
Beat heavy cream separately until it peaks and add it to the egg/bourbon/rum mix.
Add the light cream while stirring.
Add the sugar to taste while stirring. Add nutmeg to taste.
Leave standing at least overnight in refrigerator with the lid slightly ajar.
Serve after at least 2 – 3 weeks in the refrigerator.

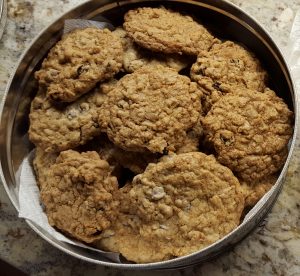
Chocolate Chip Garbage Cookies

This recipe began with the basic oatmeal cookie recipe on the oatmeal box. But, of course, that wouldn’t be enough. So we added chocolate chips. Then we added nuts. And then whatever was lying around in the kitchen cupboard was fair game. Like currants or coconut or raisins.

Eventually we started calling it our Chocolate Chip Garbage Cookie recipe. No actual garbage involved, just whatever looks handy. Some people seem put off by the name but you won’t be put off by the result.

Prep time: 30 minutes
Bake time: 15 minutes per batch
Servings: 3 – 4 dozen cookies depending on size

Ingredients

1 cup butter, softened
3/4 cup brown sugar, packed
3/4 cup white sugar
2 eggs, room temperature
1 tsp vanilla
2 cups flour
1 tsp baking soad
1/2 tsp baking powder
2 cups oatmeal
1 cup coarsely chopped walnuts
1 cup semi-sweet chocolate chips
1/2 cup raisins or black currants (optional)

Directions

Chop nuts and set aside. Measure chocolate chips and add to nuts.
Measure oatmeal and set aside.
Cream butter and sugar well. Beat in eggs, one at a time. Add vanilla.
Mix baking soda and baking powder into the flour. Add to the wet ingredients slowly, mixing well.
Add remaining dry ingredients, mixing just enough to distribute well.
Put dough in refrigerator to chill while preheating oven to 375F.
Form dough into 1 – 1.5″ balls and set apart on cookie sheet.
Bake for 10-15 minutes depending on size and how you like them.

Notes

Using a #40 scoop works really well for measuring out the dough and it keeps your hands cleaner.
Another option is to roll the dough into a 1.5″ log, chill, and then cut 1/2″ slices to put on the cookie sheet. This is also useful if you want freeze half the dough for later.
Longer bake time produces crunchier cookies.
Use high quality semi-sweet chocolate chips. Ghirardelli or better.
Chilling the dough for 10 minutes after placing on the cookie sheet will reduce the spread and make higher cookies.

Variations

This recipe can be tweaked in a lot of directions depending on your preferences and imagination. The simplest is to add the optional currants or raisins. My family objects to that, so I make them without. Read on for more…

Oatmeal Cocoa Walnut

Leave out the chocolate chips. Increase the sugar to 1 cup of each and add 6 – 8 heaping tablespoons of cocoa powder. (Sift it together with the flour to avoid clumping.)

Coconut Cocoa Walnut

Same as for Oatmeal Cocoa Walnut above, but replace the 2 cups of oatmeal with 2 cups of shredded coconut.

Almond

A variation that can be used with any of the above:
Replace about 1/3 of the flour with Almond flour.
Use chopped almonds for the nuts.

Banana Bread

This recipe is based mostly on a recipe for “Banana Nut Bread” from the McCall’s Cook Book (1963). The primary change is the addition of chocolate chips. This change was demanded by my family and, after some resistance, I gave it a try. We now think of it as Banana Bread Crack. With the chocolate chips, it disappears in a couple of days. Without them, I still have banana bread left after a week.

Ingredients

2 1/2 cups sifted all-purpose flour
3 tsp baking powder
1/2 tsp salt (a little more if using unsalted butter)
3/4 cups white sugar
1/4 cup butter, softened
1 egg
1 cup mashed (very) ripe bananas
Zest of one orange. (Fresh, please.)
1/2 cup milk
1 cup coarsely chopped walnuts
1 cup semi-sweet chocolate chips (Ghirardelli or better)

Directions

Preheat oven to 350F.
Grease a 9 x 5 x 3 inch bread pan. Line the bottom with parchment paper, if you have it.
Sift the flour with the salt and baking powder.
Roughly chop one cup of walnuts and set aside in a bowl.
Measure out one cup of chocolate chips and add to the walnuts.
Mash two or three ripe bananas, depending on size, to get a cup or so.
Zest an orange.
In your mixer bowl, beat the butter, sugar, and egg until smooth.
Add the mashed banana, milk, and orange zest. Mix.
Add the flour slowly, mixing until incorporated and smooth.
Mix in the nuts and chocolate chips.
Pour into the prepared pan.
Bake on middle shelf of the oven for about an hour or until a cake tester comes out clean.
Cool for 15-20 minutes, then turn out onto a rack to cool completely.

Notes and Variations

For best flavor, use fresh orange zest. Second best would be a few drops of orange oil. If you have no other choice, use 2-3 tbsp of the dried stuff that comes in a bottle.
Don’t cheap out on the chocolate. Use whatever is your favorite high quality brand. Semi-sweet works best.
If you don’t want to put in the chocolate, increase the sugar to 1 cup and nothing else needs to be changed.
Let it cool completely to room temperature before slicing. It will tend to crumble if you try to slice it when warm.

Mandarin Orange Cake

Well, I like baking cakes so the answer is easy. The only problem is coming up with a recipe.

My friend Mr Google hooked me up with a lot of recipes for Mandarin Orange Cake. 90% of them had the first ingredient as “yellow cake mix” or “white cake mix”. Well, that’s not happening.

But there were a few “from scratch” recipes. Because I wanted a simple recipe, I narrowed it down to two that are very similar and this is a slight variant on those. This worked out surprisingly well and was very quick and easy to make.

Ingredients:

2 cups all purpose flour

1.5 cups white sugar

2 large eggs

22 oz canned mandarin orange pieces, drained

2 teaspoons baking soda

2 teaspoons vanilla

1/2 teaspoon salt

Directions:

Preheat oven to 325F.

Grease a 9×13″ pan or line with parchment paper and lightly grease that.

Sift flour with baking soda and salt.

Put all ingredients in a large mixer bowl and beat well for 3 minutes.

Pour into prepared pan and bake for 40 minutes.

The cake is done when a toothpick stuck in the center of the cake comes out clean.

When cold, ice with a cream cheese icing to which several drops of orange oil have been added.

Notes and Variations:

The original recipes called for a syrupy topping. I have changed to a cream cheese icing because the original is too sweet for my taste.

The original recipes listed two 11 oz cans of mandarin orange. My cans were 15 oz, so I went with 1.5 cans, more or less.

You can replace the 2 tsp vanilla with almond essence.

You can add a few drops of orange oil to the batter to kick up the flavor.

I haven’t tried this yet, but I think it would make a good layer cake if baked in two 8″ square pans or two 9″ round pans. I would use the same cream cheese icing between the layers.

You could add raisins or coconut or nuts (chopped almonds?) to the batter.